Dec 3, 2012

Keeping data safe - Part Two

Some say the devil is in the detail. This may not be necessary for a succesful backup strategy, but it keeps things nice and tidy: Partition your data. If you can partition physically, on different disks, that's great.  Even if you only have one hard drive, you can split it into several partitions. And on mobile devices, you can split between internal storage and external storage (SD cards). There's also software for partitioning SD cards.

It can be as easy as splitting between data and programs, or you can be more fine-grained. If you split things this way, you can always install a different operating system, or install your data-disk in another system, without dragging along old mud from previous installations.

Then, you should always save your data to the designated data-partition, and keep the operating system and program files on the other one. This is actually what I've run into many times, the OS stops working, and you're unable to get in to copy those files to where you want them.  If they're on a separate partition, or better yet, separate hard drive, you can easily reinstall without touching your saved files.

There's a word to be said on "data" as well, you can choose to split it into "commercially available" and "not commercial available". The latter one being stuff that you can't buy or download or otherwise get your hands on, should it disappear from you device - that's your personal notes and photos, and whatever else you create.

Should I back up my programs?

You have to install programs again on your new installation - unless you create an image of your disk, and use that instead of backup. That's a question I get from a lot of people, shouldn't I back up my "c:\Program files" folder? Well, no, not really. Some configuration files or the files you saved from the programs, of course. But most programs require registry changes, different files to be created and permissions to be granted. These won't be recreated if you simply copy your old Program Files folder  (or your \usr\bin) over to your newly installed drive.

You can choose to back up the installation files for your programs, but chances are they are available online anyhow. For convenience's sake, you may keep them around (especially if you have a license for a specific version!).

With Windows 8 you have the option to "reset" the operating system  to it's initial state, or to a point in time you've set by yourself, and then it's possible to keep your programs and settings as they were at that point. In earlier versions of Windows, you'd have to make disk images to keep this sort of functionality. Anyway, the best idea is still to separate your concerns between data and programs, because it just may be that your next operating system won't be able to install on top of the last one. Or - you're unable to restore from your system restore point, and then what do you do?

Next part coming up: mirroring disks and why it makes sense (and how it's connected to partitioning).

Nov 25, 2012

Setting up Telldus Tellstick Net

This is a very quick post on my latest gadget purchase, the Telldus Tellstick Net.  It's a networked radio signal transmitter, designed for home automation - which is what Telldus is all about.

The device is small, it can run on USB power or from the mains, and it has holes for wall mounting. Great start!

After installing the device, which is a breeze, just login to live.telldus.com. It should already have detected a tellstick net  from your location. I just clicked OK and it was activated. Smooooooth - no need to punch in that nasty 24-character ID.

I had a little trouble using live.telldus.com from Google Chrome, but IE9 was fine. Another problem is that if you register using google, as I did first, you get an e-mail with a password, but no indication of this from the web page. So I was unable to log in with my google account and registered a regular account,when getting the password, I saw that one was already sent to my google account. This is something the Telldus guys should fix.


Once logged in, start by adding devices. What's very cool about the Tellstick Net, is that it doesn't only support Telldus and Nexa devices - it supports a wide array of on/off switches, dimmers and sensors. Check out this list!

 I first added my devices from the Nexa  "code switch" (which I guess is more commonly referred to as "remote") , but was unable to find the "house code" on it. You have to look under the battery cover for it.

A downside using the code switch is that you only get on and off state. If you want to dim the lights, you have to have a dimmer (duh!) and also install it as that - not via the remote.

But that's also very easy, just click on the learn button in the web page, and then the learn button on your dimmer (on the Nexa one's it's a green light). The light will flash when a successful match is made. This does not override your remote unit number, if you have already learned it there, so you can still use the remote.

Now you can add a group device also, which is currently in beta, but works just fine. For instance, create a group called "lighting ground floor" and make it switch off  every night at 10:15 PM. I've not tested if this works only when the internet connection is up.

Other cool stuff: You can install XBMC Light Controller plugin to make the light dim when you watch movies from your XBMC. Read more about it in this forum post. Excellent work, Henrik!

Nov 22, 2012

Keeping data safe - Part One

My girlfriend's laptop wouldn't boot the other day. No startup options, just the good old "inaccessible boot device" message. After the initial shock, and a hundred reboot attempts, she started realizing perhaps her laptop was not going to boot anytime soon. Panic time.

I'm going to share my thoughts on keeping your data safe, and even if they're just my thoughts, but I've put them to the test over the last years - and so far, I'm quite happy with this "strategy".

Baby photos, videos and diaries

If you're anything like my girlfriend and me, you keep a lot of your personal memories on your computer. Nearly everyone has a smart phone, digital camera and perhaps a digital camcorder. The things you capture and create on these devices, cannot be found anywhere else. And you probably want to keep them safe, for that exact reason.

Until recently, people have been storing their memories in a physical format. That's actually much harder to keep safe, than the digital memories today. But for some reason, a lot of people think otherwise. Earlier, you had to make copies - physical copies - of your photos or videotapes, and store them somewhere. Today, you can mirror your data instantly, and have two or more copies available at all times. You can spread them over the world, if you think it's necessary, in fact; you probably will without knowing. And the big difference from the old physical world: It doesn't have to cost much at all.

The Cloud to the rescue

You've probably heard about the cloud, a popular buzz-word the last years. It's not just for big companies or programmers, it can also provide great service for consumers. Backup is just one of them (or rather - storage as a service, STaaS).

Dropbox, Microsoft Skydrive, Amazon Glacier, Google drive and Jottacloud are just the top-of-my-head examples of cloud storage services. Some of them just offer storage space, some offer a complete backup solution - I use jottacloud. With these kinds of applications, you just register for a username, install the application and you are on your way to keeping your data safe.

At the time of writing, Dropbox, Skydrive, Jotta and Google drive all give you a free quota of space, when you go beyond that, they start charging you. So if you don't need any more than the free quota, this is actually completely free.

However, many of us will need more, actually my camera's memory card is capable of storing more than the free quotas. Before you think that these are expensive solutions, think about the initial cost of getting an external drive. Then, there's power consumption, monitoring, and staying alert to replace the drive if it should fail. I think you'll find that the cost is worth it, for the extra peace of mind.

Mobile too

Yep, more and more people are storing a lot of data on their mobile devices. Of course the cloud people have  though of this, and provide services for IOS, Android and Windows Phone 8. There are other ways too, apps that let you sync directly to your computer.

I think it's a great idea to install something like SugarSync that keeps your mobile data backed up. Just remember to include that folder in the folders that you back up.

In fact, your mobile phone should be on top of your list of items to back up, because for most people, it's where you keep all your contacts, snapshots and calendar dates. And mobile phones are so much more at risk of being stolen or broken, than your desktop computer at home.

Hedge your bets

Of course, Cloud backup is not a silver bullet. It is a great worst-case solution for me, as I have purchased "unlimited" space and can upload all that I want to keep safe, but I would prefer never to use it. I want to hedge my bets, so that my data are safe no matter what, but I want to keep my options open - restoring a backup from the cloud can be like cracking a nut with a sledgehammer, if all you're doing is reinstalling Windows.

Let's say that my computer is stolen, or my house burns to the ground (knock on wood). In that case, I would be really happy to download all my stuff right onto my new computer! But in most other cases, this would not be the preferred way. It takes time, and there is a chance that you have lost something. There's always a time window between your last backup and your crash, though it may be very short, you will lose data.

I've made a little table of how this hierarchy may look:

What Saves you when Won't save you when
Partitioning Operating System reinstall Hard drive has failed
Mirroring Hard drive failure Operating System reinstall
External drive External drive failureDrive is gone (fire, theft)
External drive off-site External drive failureNetwork is down
Cloud storageAll of the above Network is down


I hope that's some food for thought for you, perhaps you've already though this through by yourself. Please share if you have any input! Part two of this article will be going into detail of the different solutions, so stay tuned.

Part two: Partitioning

Oct 28, 2012

Peeking into Windows 8 themes

Windows 8 has it's themes, just like it's predecessors. Microsoft, as usual, has published a good amount of information, also about sharing themes that you have created.

What they fail to mention is that the magical .themepack file is just a file archive, compressed using the LZX algorithm. Microsoft is known for using format this previously.

Anyway, if you want to look at the specifics of themes you've downloaded just extract them using you favourite LZX-archiver - for example, 7-zip. You can now pick out images and sounds as you like and create "remix themes" for personal use, or edit the settings in the .theme file inside the archive.


Oct 14, 2012

Weird right-clicking behavior in Windows 8

Recently I started to get an annoying problem on my laptop. I was using chrome, and suddenly my bookmark tab and apps buttons would stop working. Or rather, the app buttons would behave just like when I right clicked them...

So of course, I tried the number one problem solver there is: Reboot. And yay, after a reboot it would work. Sort of. After a few minutes, the problem would return. Anyway, I gathered this must be a problem with chrome, time to update, or at least try another browser.

Guess what? It did not help - but it did show me that the problem exists throughout windows 8, not just in chrome. If I clicked something in the start menu (or metro/modern/whatever ) nothing would happen. If I did a search and clicked one of the results, all that would happen was a green check mark would appear and disappear next to it.

I also noticed, if I use the desktop chrome, and click any of the tabs, it's like the application loses focus. Could be the same issue with the start menu, but it's harder to tell because there is no title bar.

So I gathered, since it's a system wide problem, perhaps it's the drivers fault, and indeed, the device manager told me the synaptics driver was from 2010. So, I downloaded the freshest version from Synaptics site. That did not work either. I have different options in my control panel for mouse now, but nothing seems to help..

One thing I did notice, is that the animated Synaptic icon in the taskbar indicates I am in fact left-clicking, while the UI is responding as if I'm right-clicking. Very confusing.


So here I am now, using my tab button (!)  for all it's worth, while I'm trying to figure out if it's a hardware problem. If anyone has a tip let me hear it...

Update, October 25. 
I finally got round to disabling the touchpad and installing a regular mouse on the laptop. This was of course to confirm the suspicion that the problem was caused by a malfunctioning touchpad. After a reboot, no right-clicking issues, yay! And I was able to navigate different windows using the mouse instead of alt+tab.

Then, after about ten minutes of use, back to square one. I am not able to navigate windows by clicking on them, and the same goes for a lot of buttons and links.

I'm going to try a fresh Win8 install and see if it helps. If not- it's off to the hardware lab.

Update, November 12.
Reinstall did not help. However, when I called HP and explained the problem, they sent a service man the next day, and he replaced the touchpad. That was last week, and the problem has not returned. Must have been a hardware failure.

Thanks, HP!

Aug 20, 2012

Windows 8 status update

Thought I'd share with you what features are working and not on my laptop (HP Elitebook 2540p) with Windows 8. It may apply to other laptops as well.

WhatStatusComment
Validity Fingerprint Sensor Working with Validity's drivers Does not always work from hibernation
HotKeys Works with HP's Win7 drivers
Wifi Native Win8 support
Ricoh Card reader Works with HP's Win7 drivers In Win8RC, Explorer would crash if the card was unformatted.
Webcam Native Win8 support
Sound Native Win8 support

Related links: HP Drivers
and Validity drivers

One thing that had me fooled for a while was how to power off the computer. The power button of course is linked to hibernation, which works well, but to shut down, I had to go to metro/start menu/whatever and then click sign out, then find the power symbol and choose shut down.
An easier way is to go to desktop (win+d) and press alt+f4, for the regular shut-down menu.
An even easier way, if you're too lazy for the keyboard, is a shortcut on the desktop. To a .cmd file that contains only "shutdown /s /t 0". It will shut down immediately, so be careful, you can change the switches to whatever is your taste.

Synaptics Touchpad

The people at Synaptics have released a new driver suite that supports Windows 8 mouse gestures (or touchpad gestures, if you will). Luckily, it also works with the touchpad in 2540p. Just download their drivers for Windows 8 and install, reboot and you're off.

Right click the Synaptics icon in the system tray and go to "Touchpad properties" for a handy introduction to the gestures and switch on and off the different ones. In my experience they all work! Especially the three-finger scroll is helpful in modern/metro UI.


Happy Windows 8 install!

Aug 6, 2012

How to get Validity fingerprint sensor working on Windows 8 - updated

I have been trying out Windows 8 RC on my laptop, it's an HP Elitebook 2540p. One of the features I've not been able to set up properly is the fingerprint login. The 2540p sports a Validity VFS451 sensor, which worked fine under Windows 7. But searching for Windows 8 drivers gave no results.

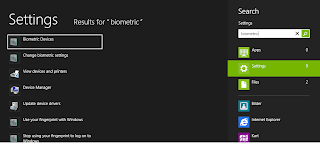
If you use Help and Support in Windows, and search for fingerprint, it tries to help you by saying type "biometric", then select "Settings" and "Biometric Devices". This, of course, leads to nothing, unless the correct driver and software is installed. It also suggests to let Windows Update find the drivers, but let's face it, if that worked you wouldn't be reading this.

So I went ahead to HP's support site and downloaded the Windows 7 64-bit drivers. They installed with no problem, and the Validity Sensor appeared under Device Manager. Yay! Now to reboot and find out if it worked.

Windows-key, "biometric", Settings, .... nothing. Ok, I'll try rebooting again.

In the end I went to the source, downloaded the Windows 7 drivers from Validity, and tried installing them. It didn't go too well. I got an error message and a question if I wanted to retry in compatibility mode. Windows suggested we run it in "Windows XP Service Pack 3"-mode - went ahead and did that, but no luck. There's a folder in the archive called DPPersonal_FMA, and subfolders for 64-bit and 32-bit, which contains a DPSetup.exe. I ran that and got through the installer with no problems, and now when I typed in "biometric" in metro, lo and behold - Biometric Devices.
Successful "biometric" search in Metro!

Now enrolling the fingerprints sure is a piece of cake! But, as I soon found out, no - not really. By clicking "Manage your fingerprint data", you enter a wizard that helps you enroll fingerprints. At least two fingers are needed. The first scanning screen is just a "test" screen to let you figure out how to scan for success... It worked fine. Then, into the enrollment view, click to select a finger, and swipe. It worked the first time. But you have to swipe several times. The second time, and N times after, I only got "swipe unsuccessful". I tried going back, tried restarting the wizard, the only thing I came up with was "Unspecified Error" and then the app crashed.

I restarted the computer again, remembering that I had the same pain doing this with Windows 7! In fact, after some time, Fingerprints didn't play well with 7 at all. The software was there, but I was unable to scan my finger. So this next step applies to Windows 7 as well, I believe. A bit of black magic and totally unstable, but the fingerprint reader is working.

  1. After the computer has restarted, log in as usual, but go straight to the Biometric Settings. 
  2. Start the wizard.
  3. Navigate the wizard using tab and enter. Do not test-scan before clicking "Enroll".
  4. Now you should be able to click the finger and scan it the required two or more times.
  5. If you get a message "the fingerprint reader is not connected", don't freak out. Just click Finish or Exit or whatever the option is. I got the same message. I rebooted again, and repeated steps 2-4. The fingerprints scanned the first time were still there the next time.
  6. When you're happy, click Next and Finish. 
  7. Try locking the screen and logging back in - using your finger!

Update August 7, 20:50 CET:
It's been a couple of days since I got it working, and I'm guessing 4 reboots. Suddenly I can't log on using my finger again. The option was there, but nothing happened when I swiped. So... I logged in using my password, went to Biometric Devices, and now the status for the reader was "Unavailable". That's just great!

I ran Update Driver... just for fun, and it installed a driver over a year older than the current. Great work! And then I was back to Biometric Devices being completely emtpy. Had to uninstall it, check the box for "remove driver software" and then reinstall the driver from Validity. Now it works again, but not sure for how long.

Update 2: December 5, 2014:
I've seen the comment that the file from validity is no longer available, but I haven't been able to research it. Today I had to reinstall the old laptop and do fix the fingerprint problem again... Guess what, HP have been busy. There's an updated driver available now, just download from here (64-bit version): HP support site   Looks like it's working out of the box this time! And for a bonus: It works on Windows 8.1, too.

Aug 4, 2012

Finding a job for the Raspberry Pi

Raspberry Pi, the new favorite toy of all us computer geeks. The small size, low power, no sound and heat makes for a very friendly installment and for some funky case mods. How about a pack of smokes or a deck of cards... I only got mine last week, but I've been waiting since the middle of May. If you want the technical details, here they are.

I tried to compile a small list of possible usages for it here, some are my own ideas, some I've gathered from various discussions on the web. Some of them require specific hardware and possible mad skills in some technical field. For almost every usage there are existing solutions available commercially, but this is for those who love to tinker, customize and learn by doing.

  • HTPC - can play back upt to full HD, has onboard HDMI and toslink outputs. Small enough to be mounted on or behind your TV. Does not need any further hardware except perhaps wifi dongle, if you don't have a cable handy. It's also the most mentioned use for the raspi that I've seen. There's a dedicated Debian-based distro for running XBMC on the raspi called Raspbmc.
  • In-car Media-server ("carputer"). The micro-usb power allows a cigarette adapter to power the unit, and it's small enough to fit inside the glove compartment (or other available spaces). Requires cigarette adapter and connection to amplifier or existing playback-device. Not sure if many regular car stereos have digital inputs, so you may have to cash out for a DAC as well. Luckily there are several USB DACs available in many price ranges.
  • Home Automation a.k.a. "Smart-House" Controller. A low-power unit that can monitor different environment variables (get it?) using whatever sensors you can get working. For example, turn up or down lights, heat, sun screening etc. It can even be used with the Tellstick Duo (or the simpler Tellstick) to turn any kind of power outlet on or off. Seems Tellus are already aware of this. I imagine connecting motion and temperature sensors, RFID or whatnot to achieve a fully automated and energy efficient house.
  • Security camera system, using the raspi as a brain in a multi-cam setup ( Discussion on the subject here )
  • Outdoorsy stuff. It's small, light and requires no more power than regular batteries can provide. It can run off a smallish solar panel or perhaps fuel cells (it requires 5V/700 mA). You can attach GPS trackers to it. Actually, that could come in handy for the in-car stuff as well.
  • Lightweight NAS. If you don't require too much space, a USB stick/HDD and/or the SD card will suffice as a NAS or at least a file server at home, without the space and noise requirements of the usual stuff. 
  • Game console - enclose the raspi in your favorite 80s gaming console box. Good luck getting it to work with cartridges or cassettes, though.
  • Beer brewing system - for monitoring of temperature and pressure, logging this, and starting/stopping your cooler/heater. 
For more creative ideas look to the Raspberry Pi forum or Hack a Day.

Also worth reading is this blog post from Scott Hanselman: Top 10 Raspberry Pi myths and truths.

Jul 30, 2012

My Silent HTPC - part 4

All right, software time! After putting the last screws in the Streacom cabinet, I had to test if it could actually be put to use.


My original idea was to try (all) the different setups for the same box. First I'd install OpenElec, then Windows + XBMC, then some Linux variant with XBMC. Turned out to be impossible to find the time with the arrival of my daughter! (Also impossible: completing this post before summer vacation.)

So to save time, I went straight for the low-cost option of Ubuntu and XBMC - following  this guide Howto Install XBMC PVR Xvba for AMD/ATI Radeon and Fusion GPUs. It worked really well, but keep in mind, it only applies if you have an AMD/ATi video card.

So, I wanted to install from a USB stick (obviously). Had to insert the USB stick in the right USB port for the BIOS to recognize it. Turned out to be the top left one, don't ask why. 

Install of ubuntu minimal from stick was effortless, though I had to rely on ethernet for the time. The installer did not seem to recognize any of my USB WiFi dongles.

Installing a usb wifi dongle - worked better than anticipated when using Atheros chipset (TPLink TN300N) (given that I didnt remember all the iwconfig, iwlist and ifconfig commands. Thanks, google!).

Using a WPA2 passkey was nearly impossible. I tried different ways in the config file and in command line, but to no avail. Turns out, it has to be converted to a hex key and saved to the config file.  Had to create the hex key using this tool [wireshark.org]  and punch that into the /etc/network/interfaces file. Here's a handy howto for that.

Then everything was golden, on boot, it skips right into xbmc without any login or menu selection or other funky business. To compare with my Syvio, I never in almost four years got it to boot straight to oversight, which was the "xbmc UI app".

Setup a Samba share for my Windows boxes to share files - no weirdness there, up and running as planned.

But then I had problems with connection speed on this usb dongle when transferring big files. Speed started out good - then dropped, then connection would time out. This seemed to be the case with the old Syvio system as well, but then I blamed it on crappy hardware. This time - not so much! So I purchased an Asus N53 USB Wifi dongle - available from Amazon.com.

After switching to the new one, sporting a Ralink 2800 chipset, no problems, and did not need to install any drivers or update the /etc/network/interfaces file. Smooth! (PS, for Ubuntu 11.10 apparently things were a little harder)

Now, to wrap up very quickly and get this post posted, there are some remaining issues.
-No sound for the time being. Have to look into that. Well, that was fixed easily, but I don't know what happened. Basically I followed the standard procedure of selecting transport and output - and the first time, I had no luck. Second time around - it works. 

-Overscan problems with Aeon - what to do. Switched back to Confluence. Probably a driver-issue. Not a biggie, anyhow.

Screen capture of sensors output
-Sensors for Asus motherboard not available for Linux. Oh joy... That's a problem, but it turns out, it kinda works anyway. It's a lot less inaccurate than some others report. And luckily it has not hit the roof - yet. Not even on a hot summers day. But I suspect that may change when I put it inside the cupboard...

-No power on/off by remote. Again, not a biggie, but I need to look into it. Especially if my girlfriend is to use it. Or if I succeed in my plan to hide all the equipment behind a wall or in a separate cupboard, that makes the power button inaccessible.

I've not used the box as much as I wanted this far, but the times I have, it has been pure bliss. It boots quickly, it looks great, the xmbc navigation is great - and it always downloads correct information about the movies/shows that I watch. Gone are the days of creating .nfo files with IMDB ids in them...just make sure you have the folder structure ready and you should be safe.

 I've encountered one single movie that didn't play well, it kept showing articfacts. I suspect it may be because of the H.264 level but haven't had time to confirm it.

All in all I am happy with the result of project, and I'd get the same hardware again. There's only the faint sound of the harddisk when the box is running, and of course during playback, it's not going to be heard by anyone. Temperature, when it's still sitting on top of my media bench, is comfortable. Performance is great, even when playing full-HD material - save for the one movie I mentioned earlier (actually performance is still good there, but there are artifacts in the picture).

Now to make some pop-corn...

May 20, 2012

My Silent HTPC - part 3

Finally, the day (or evening) arrived! Time to assemble the hardware and get this show on the road. Both the motherboard and the chassis included manuals, so starting off as any pc build.

After removing the base for the stock CPU cooler, attach the supplied nuts to the holes. I had no problems with them not sticking well, but that may be because I had some hours break before trying to screw anything into them.

The chassis already had spacers for a m-atx board in place, so just align the IO shield and board and secure it using the provided screws. With so many similar screws it might have been better if Streacom supplied a number on each bag indicating which screw goes where, but you should be able to figure it out anyhow.

Install the CPU, the RAM and SATA cables (if you're installing the optical drive). The RAM should be installed because it's easier now - when the heatpipes are in place, you'll need a very small finger to push the "release button". The optical drive totally blocks the SATA connectors.

Asus F1A75-M Pro


Now, mount the CPU cooling block. I was afraid of overtightening mine, but using the criss-cross method and stopping when it "felt right" - the steel brace was just getting a little bent - I had no problems. Though I think the supplier could have done better here. Either with some springs or spacers or whatever. Anyway probably better to go to loose in the first run than too hard, and end up crunching your CPU.

A word on applying the TIM (thermal inducing matter) to the CPU, I always relied on just a "drop" of TIM onto the center of the headspreader before, and I did again. It's a lot easier than trying to spread the TIM by hand, and the block does a pretty great job at spreading it out even when you press it down. If the whole heatspreader isn't covered it's not really a big deal; most of the heat comes from the center.

Time to attach the heatpipes! First, do a dry run. It's messy with the TIM applied. Luckily, I did a dry run, and what do you know - the pipes don't fit. The long ones run just too far. The short ones were no problem. As it turns out, copper is a very soft metal. So you can bend them very easily, without applying any heat or force. Two things to be aware of:

  1. They are filled with gas or liquid, to aid with the heat dissipation. 
  2. They can crack... 
You don't want number 2 to happen because of number 1. So, use as little force as possible, and dont bend them too far. If the heatpipe is straight, you probably shouldn't try and bend it to a ninety degree angle. If it cracks open, you'll risk the contents getting in your face, and you'll have a hard time soldering the broken pipe back together. Make sure you insert the heatpipes in the blocks before bending anything. If not, you'll have to be very careful when forcing them through the block later, or in the worst case, bend them back.

Heatpipes in lower part of CPU  block - dry run.


Heatpipe inserted in block? Good. To adjust the heatpipe, I just clenched my fist a little tighter around it and that bent it just enough for me to insert it into the chassis. It's a tight fit because of the power button. I also had to bend the part that goes into the CPU block, but very very slightly, and keep the part that goes into the block straight! When the heatpipes are aligned and tightened to test, you can apply the TIM. 

Heatpipes in block, bent and with TIM applied.


I know the manual suggests applying TIM to the heatpipes while in the block, and then spin them - I did not. I figured you want the heat to spread from the inside of the chassis, out to the cooling ribs on the outside - it makes sense to apply the TIM only on the ouf-facing side of the heatpipe. So I attached the bottom screw in the side-wall blocks, left some drops of TIM in there on the heat pipes, attached the other screw and tightened. The TIM should now be spread out evenly and without leaving a mess.


Finally mount the top part of the CPU block, first of course laying a very thin line of TIM in the ridges on the lower part of the block, then applying the same amount of TIM in the ridges of the top part, and finally put them together and tighten screws. Done!


Click here for part four!

May 13, 2012

My silent HTPC - Part 2

So the day finally arrived! Actually, it did last week-end, but I've not had any free time until now. I had to do the classic "hardware shoot":


Nice, huh? Not much to say about the different items packaging really, it's all pretty standard. Except maybe for the heatpipes and CPU block of the Streacom FC5 chassis:


That's what I like to see, well-protected from rough handling in shipping. The printed instructions could have been better, but there's a more in-depth manual with the chassis as well.

So far I learned that the optical drive uses a special kind of SATA connector, a slim-line SATA where the power and data connector are together on one connector. I don't have one like that, so I had to order one now. I guess it applies to more slim-line drives than the Sony BC-5600S - so watch out.

Next part - installing the hardware!

May 3, 2012

My silent HTPC - Part 1

Three years ago, I got a Syvio 200a NMT (Networked Media Tank). I was quite happy with it at first, since I could play1080p on my TV, when I didn't have a blu-ray player. Over time, I got less and less happy with it, because the media collection on it grew, and it became slower, and slower, and... well.

Now I've decided to upgrade to a tailor made HTPC. And I figured, why not blog about the experience. After all, I have no experience building this kind of PC (I've built a lot of regular deskop PCs) and I imagine some other could learn from it.

So, part 1: Deciding on what to get. I had some requirements:

  • Obviously, 1080p playback via HDMI
  • Slick UI - like oversight on the Syvio
  • Small
  • Little or no noise
  • Fit in with the rest of my stereo components

The Syvio is very small, but I don't need quite as small a box. In fact it'd be more convenient if it were a standard width component. I quickly landed on the Streacom FC5 OD. This is a completely fanless chassis, which supports mini-ITX and micro-ATX, up to 65W CPU. A drawback is the price, of course. Also, the 150W Pico-PSU and the IR receiver are not included. So if I were on a budget, I'd go for the Aplus CS-160 mini.

Image from tomshardware.de


Now to choose the platform. In a HTPC system, graphics performance is pretty important. With that in mind, and what I could read on numerous forums, the AMD Llano (FM1) APU seemed the right choice (Intel is more expensive, and, until Ivy Bridge, their GPU did not beat AMD's). I went for the A6-3500 since it had a triple core for multitasking, and a better GPU than the A4 series. ALso the more powerful A6 and A8 APUs are rated at 100W. For the price, it's certainly worth trying anyway. And it may be possible to add a discrete card later (using a riser card), for getting CrossFire performance!

Since the chassis has specific requirements to which board can be installed, I went for the Asus F1A75-M PRO, which is listed on their list of supported motherboards.  I also happen to like Asus' products. The A75 chipset also gives you SATA 6 Gb/s and USB 3.0 interfaces.

Image from Asus


Unfortunately, it's a micro-ATX board, which means the 3.5" HDD mount screws are unavailable. So I  got the only TB 2.5" drive I could find, WD Scorpio Blue. (Not having a NAS I have to rely on local storage, and I figured SATA 6 Gb/s interface is overkill for playing movies, I've never run into issues before with my SATA 2 drive. If space is really an issue there's another 2.5" bay available for another TB later).

The optical drive was really a no-brainer since the chassis supports only slim 3.5" drive with eject button to the left, and the only one I could find like that was Sony's BC-5600S. It's the only one I could find that matches that.

Finally I need some memory and ended up with Corsair Vengeance DDR3 1600MHz 8GB CL9, probably overkill with 8 GB but you never know. It has standard timings and voltage, and I've read that it works without issues with the motherboard.

As for the software, I've not yet really concluded, it'll be up to the next parts of this blog. I'm really leaning towards Ubuntu with XBMC installed, XBMCUbuntu or Open-Elec. If I run into too many issues with drivers etc, I may consider Windows, but from what I've found I should be able to run XBMC on linux with this. (I even checked, the IR remote is usable with ubuntu).

If you live in Norway, komplett.no has my shopping list. (Though I'm in no way affiliated with them)

Click here for part two!